Installation of Ubuntu Linux 11.10 (Oneiric Ocelot)
This guide will show you how to install a new Ubuntu 11.10 desktop system on your computer. If you want to upgrade from Ubuntu 11.04 to 10.11 then follow this link…
1) Download Ubuntu Linux 11.10
The Ubuntu Desktop CD is so-called LiveMedia which allows you to try Ubuntu without installing or changing your computer at all. The desktop will present an icon that lets you install Ubuntu permanently on a hard drive.
Ubuntu Desktop comes with many great applications for both professional and home computing. Please take this demo tour… and study these features… before starting the download.
Download the installation image (Desktop Edition)
Browse to http://www.ubuntu.com/download… and choose an installation image for your computer.
The minimum memory requirement is 512MB for graphical LiveMedia (LiveCD or LiveUSB) installation. If your system has less memory, use the low calory, text based installer…
The image name is “ubuntu-11.10-desktop-amd64.iso” for the 64-bit version and “ubuntu-11.10-desktop-i386.iso” for 32-bit. Notice that the amd64 image will run on all Intel/AMD/Via/etc. compatible 64-bit processors. Choose the 32bit version if you are in doubt !
Download the installation image to your computer where you can burn it to a CD/DVD or USB memory stick.
Small notice about servers
For servers you should get the “Ubuntu Server 11.10 CD”. Ubuntu Server 10.11 (64-bit)… is a very professional and reliable server operating system suitable for both business and home servers. And you can easily manage your Servers and Clouds with the Canonical’s Landscape… system management and monitoring tool.
2) Burn your CD or create a USB drive
Follow the step 2) of this guide… to burn the .iso image to a CD or USB-memory stick. Set the options and click the [Show me how] button for detailed instructions.
3) The installation
Put the installation media (CD or USB stick) into the drive, restart your computer and follow the instructions that appear on the screen.
Make sure your PC can boot from the CD or USB-drive. You can normally select the boot-device by pressing F8, F12 (or similar function key) during the computer’s startup. You can also change the boot-order in your computer’s BIOS (setup).
Try Ubuntu
Then select the “Try Ubuntu” option from the menu as shown in picture_3a.
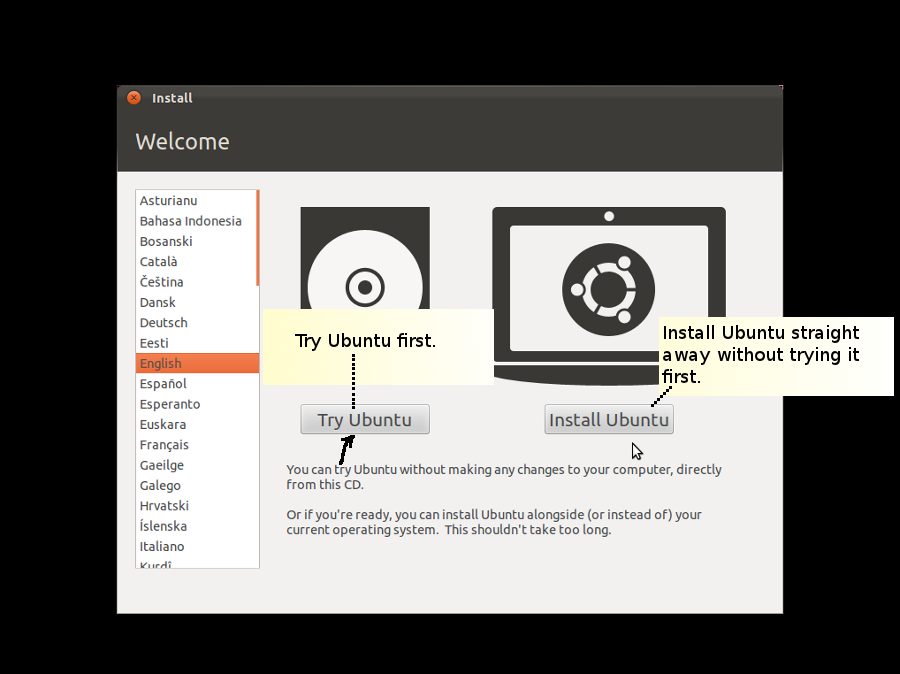
It will load a fully functional Ubuntu Linux desktop. The “Install Ubuntu” selection will let you skip the LiveMedia/try-it-first part and start the installation straightaway.
After the LiveMedia has loaded, nothing has been installed on your hard drives – it all runs from the CD or USB drive. You can now test and play with Ubuntu before the final installation.
Of course, if you downloaded the text-based installer, it will start the installation straightaway without showing the desktop.
Start the installation
Start the permanent installation by clicking the “Install Ubuntu 11.10” icon on the desktop. See picture_3b.
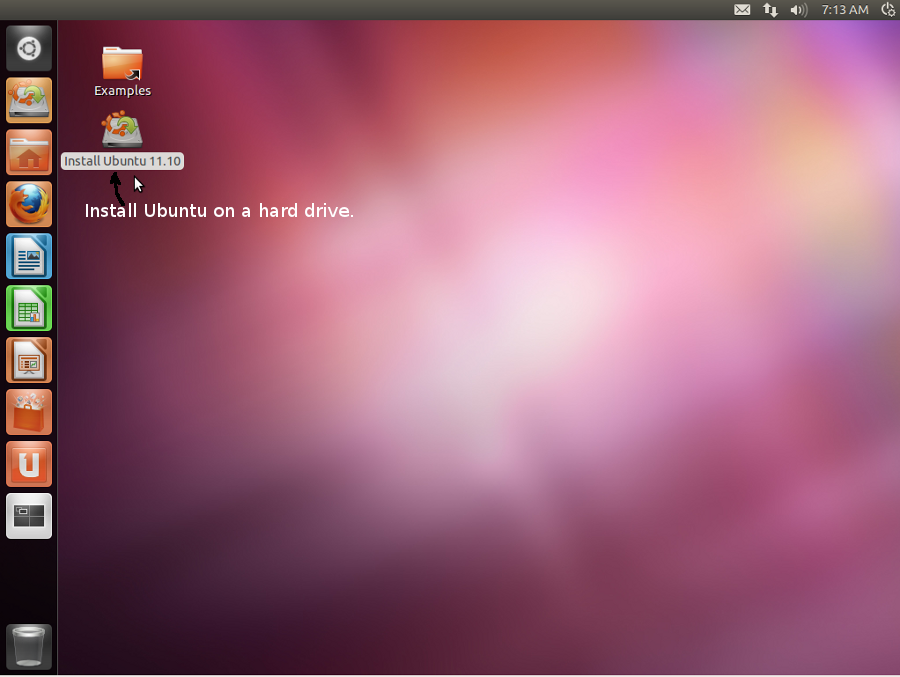
The installation program will let you create new partitions and and modify existing disk partitions.
Choose partitioning method
Automatic partitioning
You can let Ubuntu automatically install itself alongside other operating systems or simply select the option that erases and reserves the entire disk for Linux. Please see picture_3c…
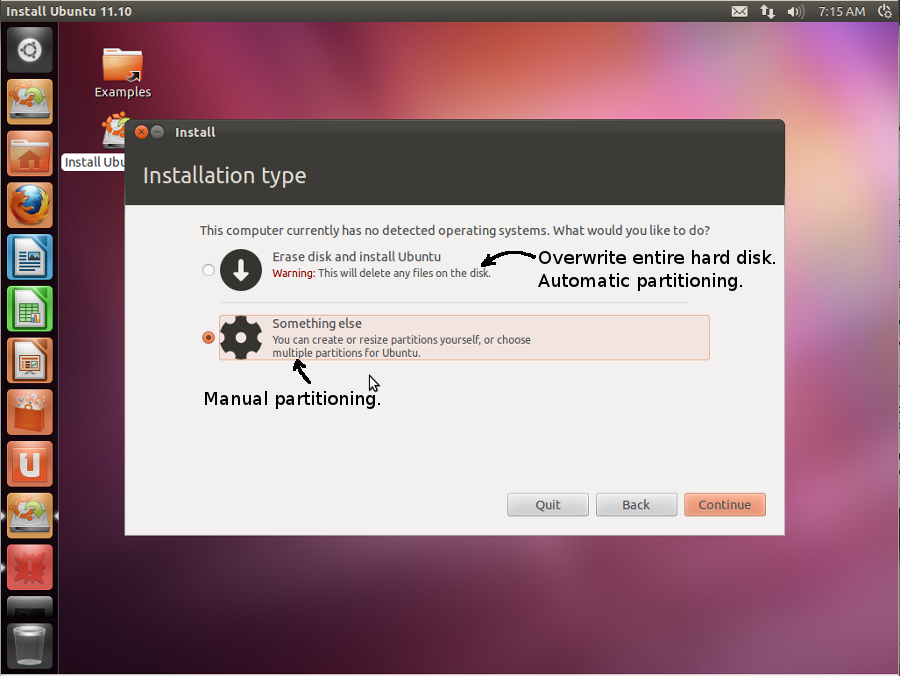
Manual partitioning
Create at least the main partition if you want to slice your harddisk manually.
-
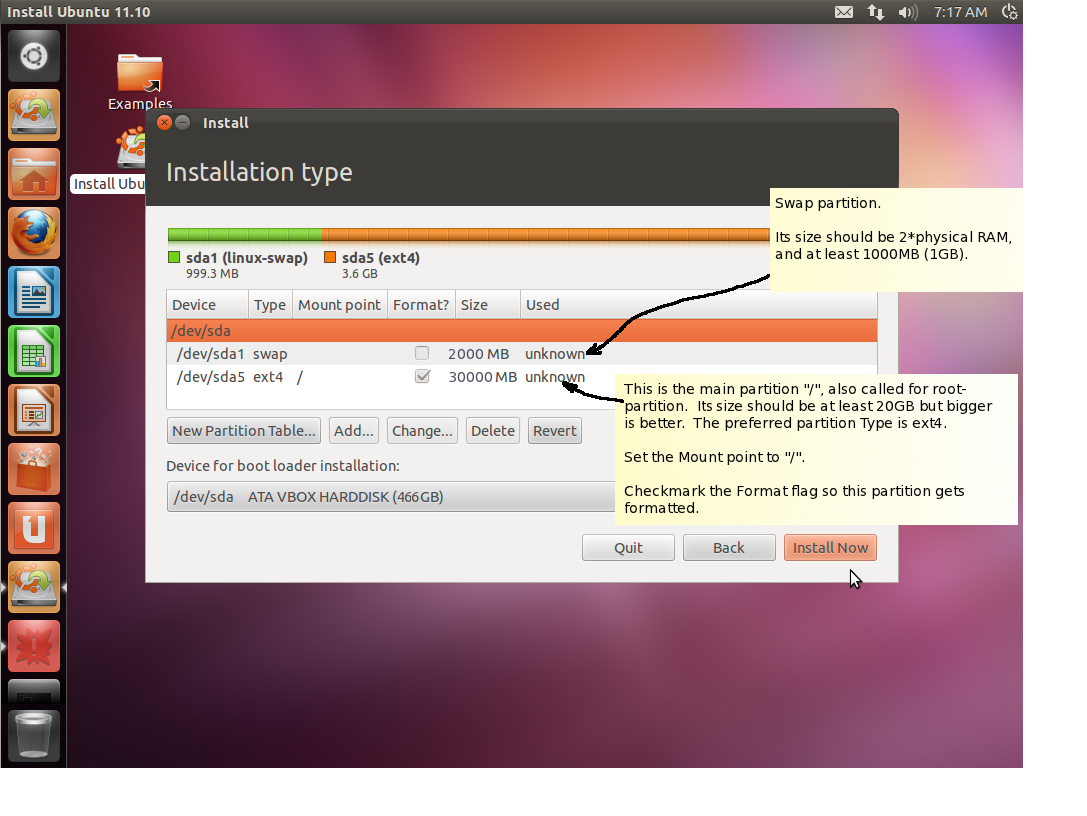
The main partition should be at least 20GB of size. The mount point for this is “/” which denotes the root filesystem. The recommended file system type is the new, and fast ext4. Study picture_3cc…
picture-3cc -
The swap partition should be around 2 times the PC’s physical memory and at least 1000MB (1GB). The filesystem type for this partition must be “swap”.
More information about the partitioning in this guide… and in this video…
Complete the installation
The rest of the installation is relatively simple. Complete the installation and reboot your computer.
4) The Unity-Desktop
Please reboot and login to your new Ubuntu desktop system – if not already done.
4a) The Dash-screen
The Dash-screen allows you to search and start programs, documents and music.
Now learn to launch and use the Dash. Click the Big Ubuntu Button to see the Dash-screen. You may need to move mouse-pointer beyond the left edge to bring the launcher-bar in front. Study
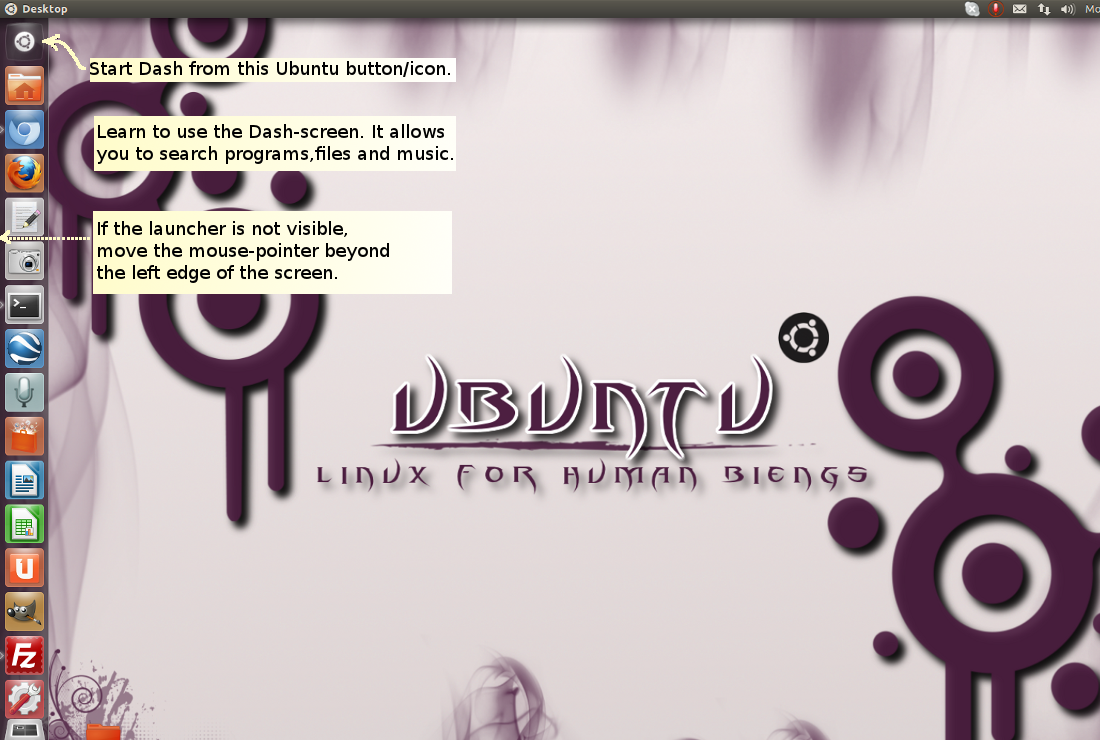
The Dash screen should appear. It allows you to search programs, files and music very easy way. Study

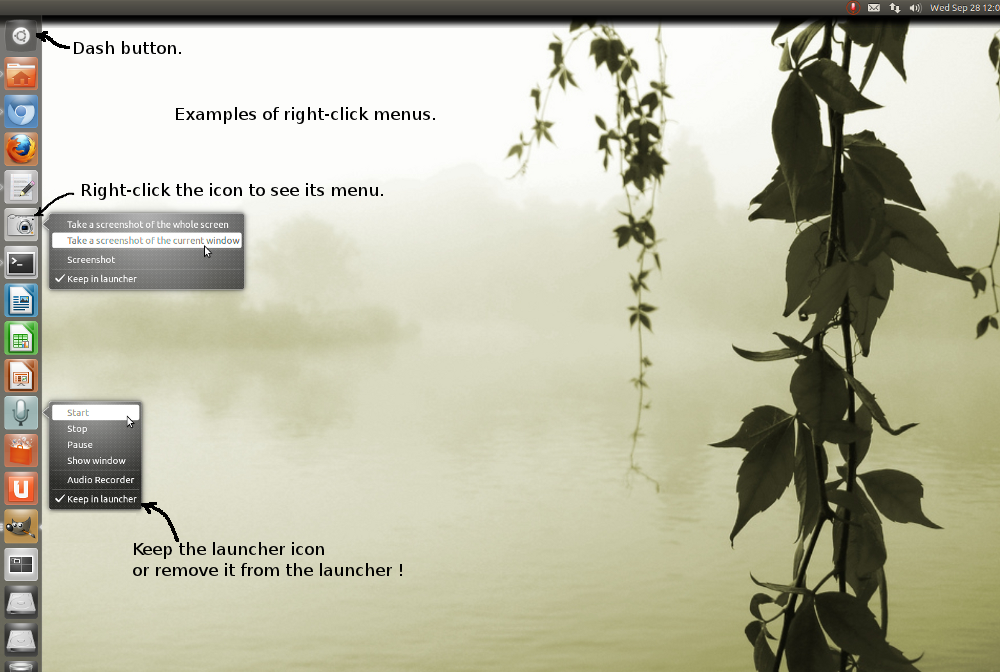
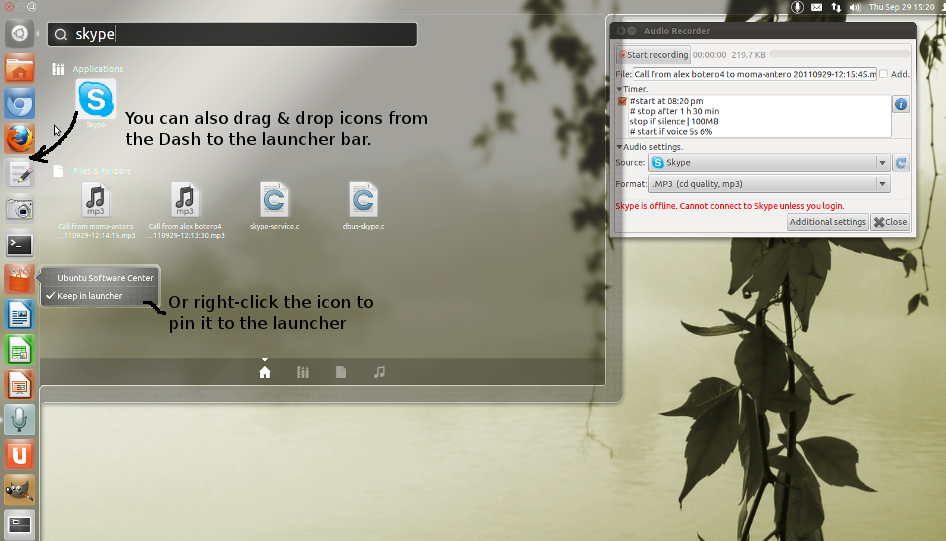
Many applications have a right-click menu on the launcher icon. Learn to use it. Study
4b) Ubuntu’s Unity Desktop
Unity is Ubuntu’s new desktop environment. It requires some training and learning!
Please study this list of keyboard shortcuts… (here is a list… suitable for printing)
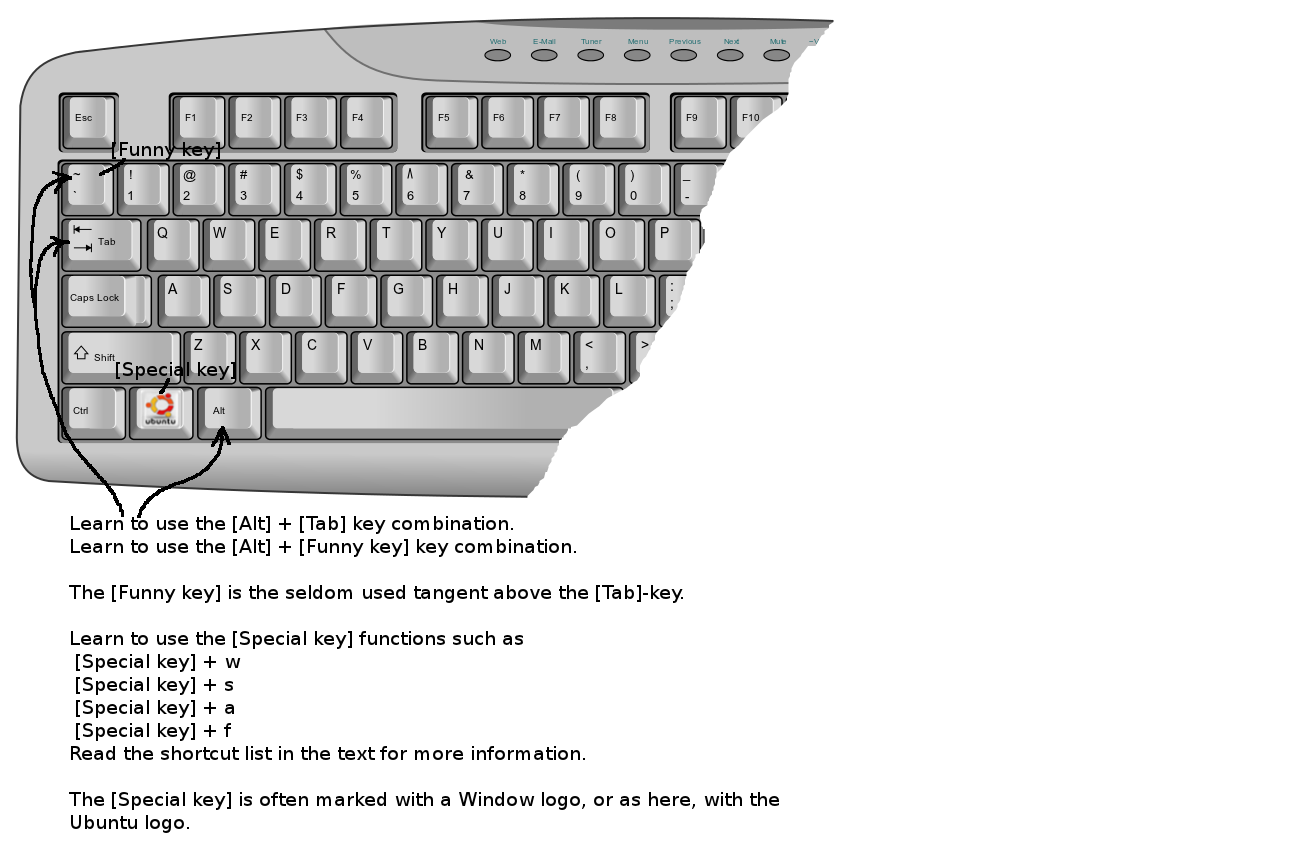
The following picture shows how to use the [Alt] + [Tab] and [Special key] combinations.
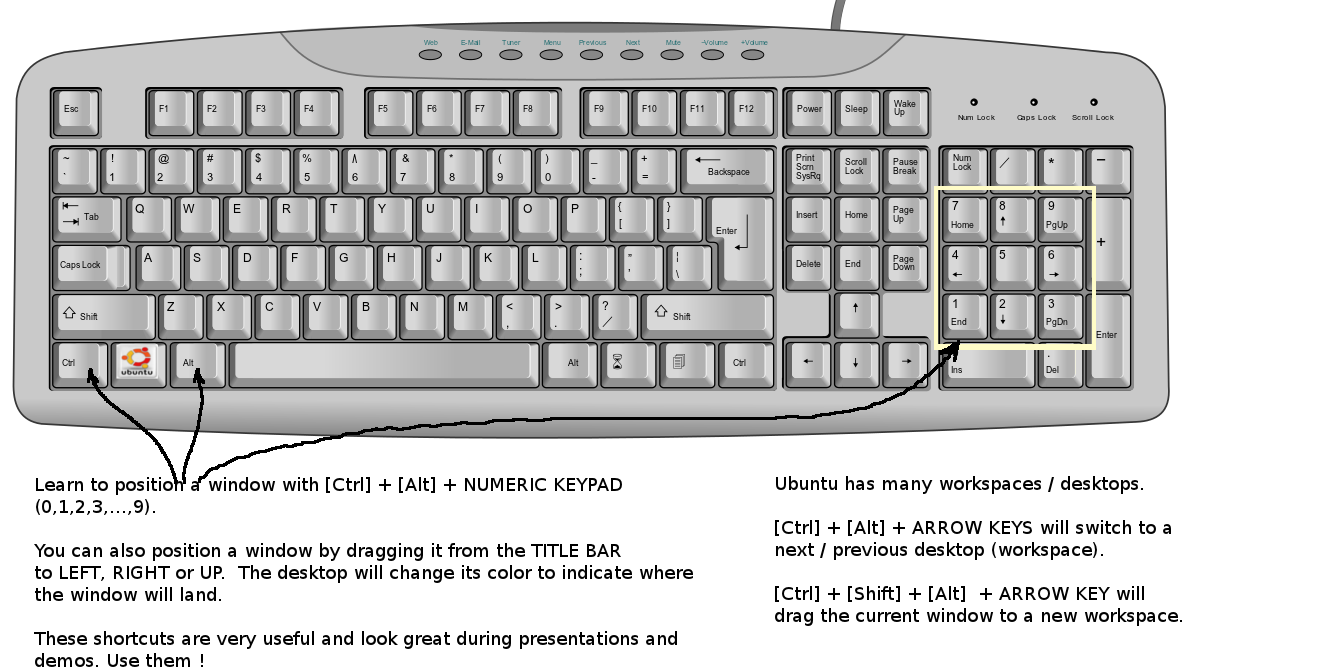
And learn to move windows effectively! Study this picture.
Here are also couple of wallpapers that presents the most important keys and mouse tricks.
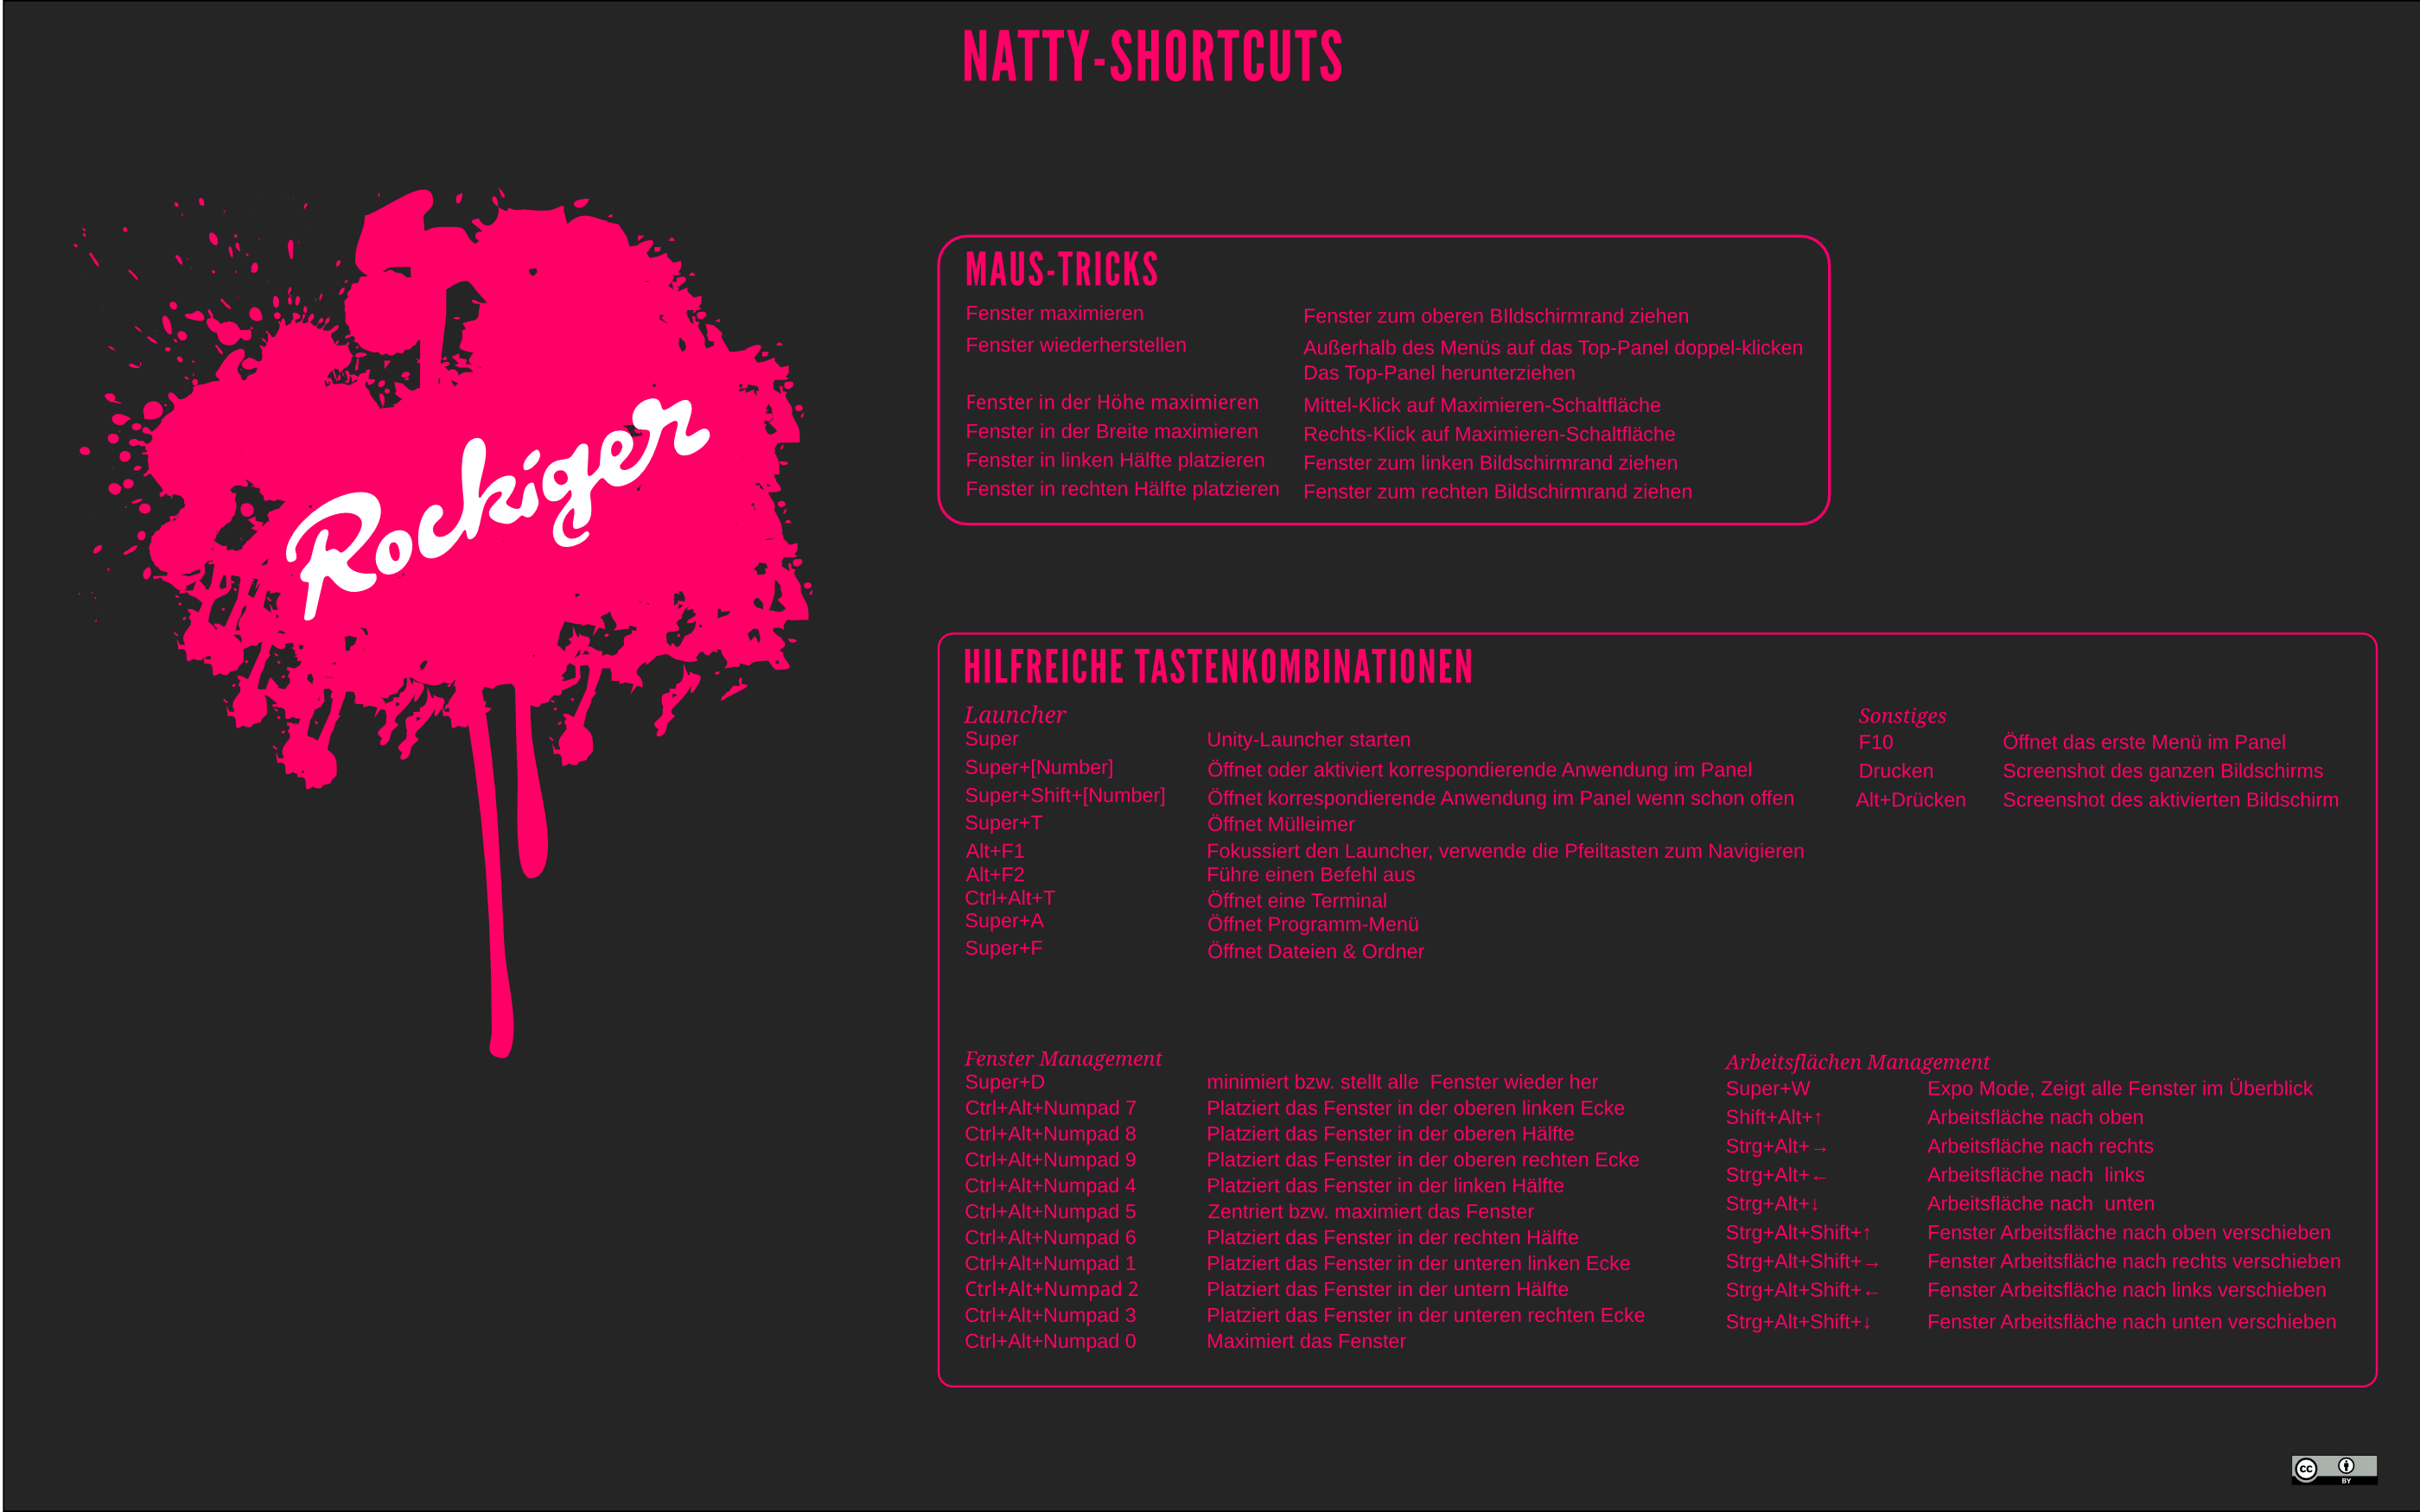 and
and

4c) Advanced Unity settings
This advice is for exprerienced users only.
I will here show you how to fine-tune some of the Unity/compiz related settings. Compiz is the underlying windowing system that manages the desktop.
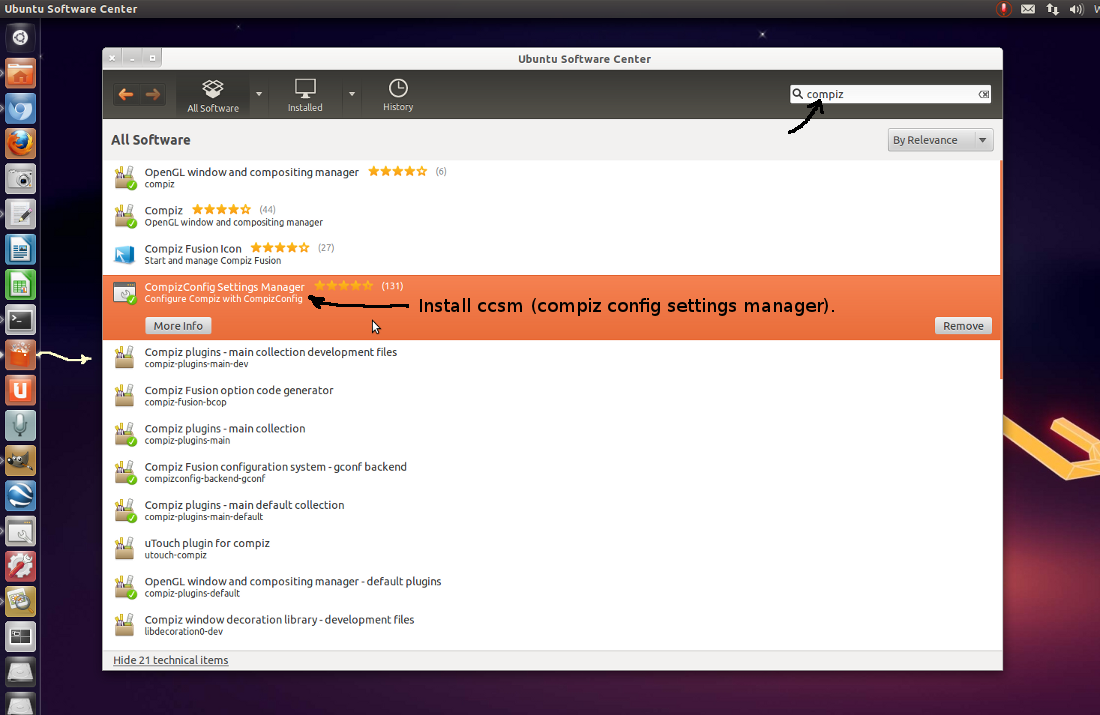
First, install ccsm (compiz config settings manager). Study picture 4c0…
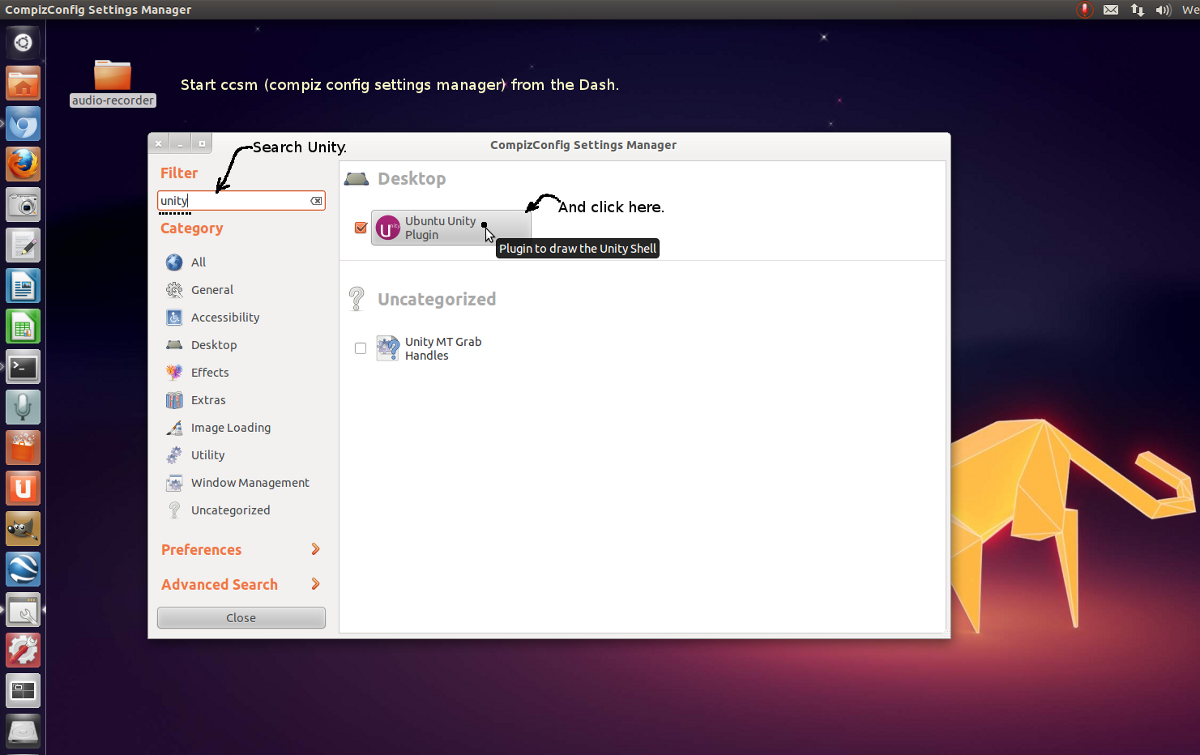
Then start ccsm and locate the settings for Unity Desktop. Study picture 4c1…
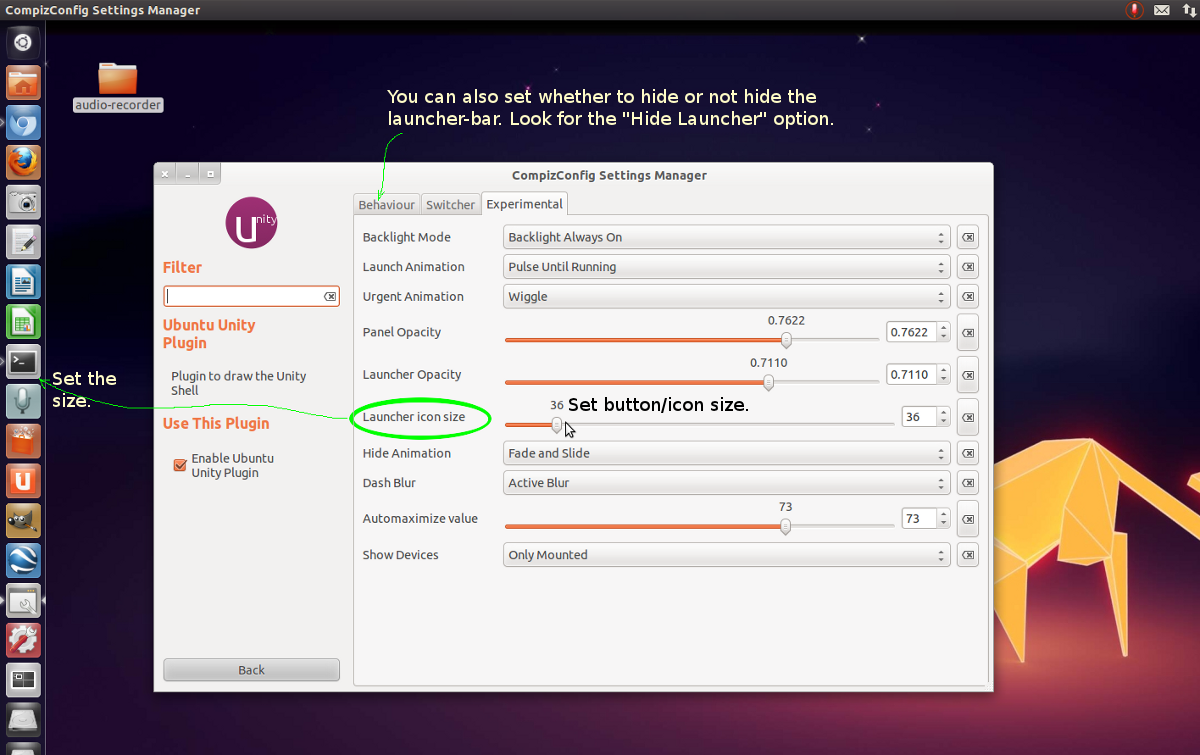
This picture 4c2… presents some of the settings for Unity. I normally set the button/icon size to 36 pixels because I like small icons.
5) Activate drivers
Activate display driver
If your computer has a rather new ATI or NVIDIA graphic card then you should install a proper (closed source) driver for it. A proper driver will make your desktop very fast and it will let you play games with full hardware acceleration.
Click the Dash-button and search for “driver” and start the “Additional Drivers” dialog. See picture_5a…
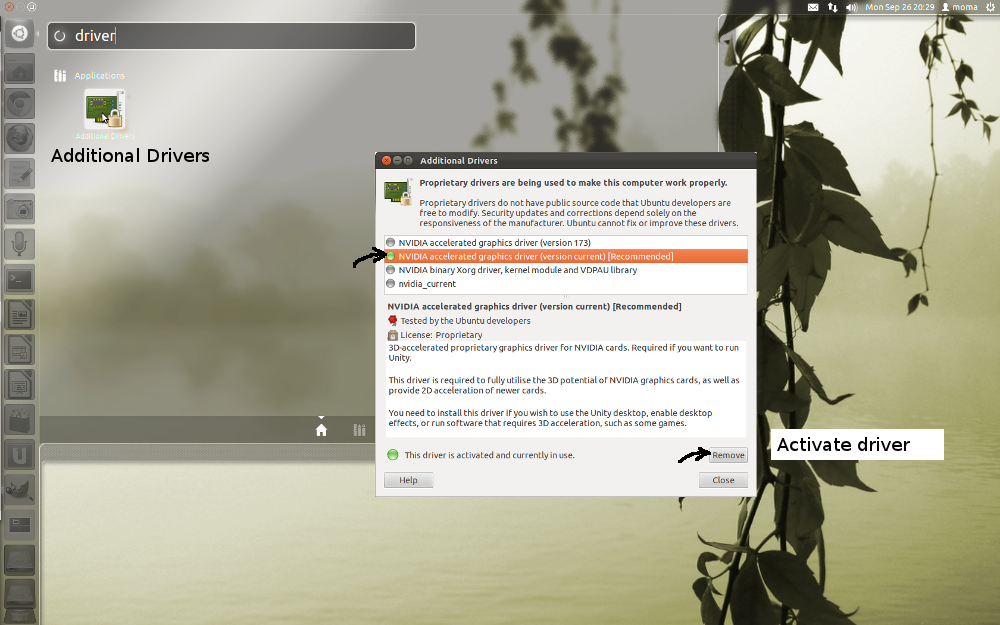
Note: If you do not see any lines (drivers) in the list then move to step 6).
Locate and checkmark the graphics driver in the list. Press the [Activate] button to install it. In most cases the graphics driver will be NVIDIA or AMD/ATI.
Activate wireless and other drivers
Activate also wireless driver if you see that in the “Additional Drivers” list.
Close the dialog after successful installation. Then reboot, restart your computer from the system menu (in the upper-right corner). Notice that the [Shutdown] selection displays a dialog that lets you [Restart] your computer.
6) Keyboard and language
The keyboard and language settings ara probably OK but check them anyway.
6a) Set language. Ubuntu Desktop and its applications have been translated to many languages. Start the “Language Support” dialog from the Dash-screen. See picture_6a. New language settings will take take effect after re-login. Logout and login.

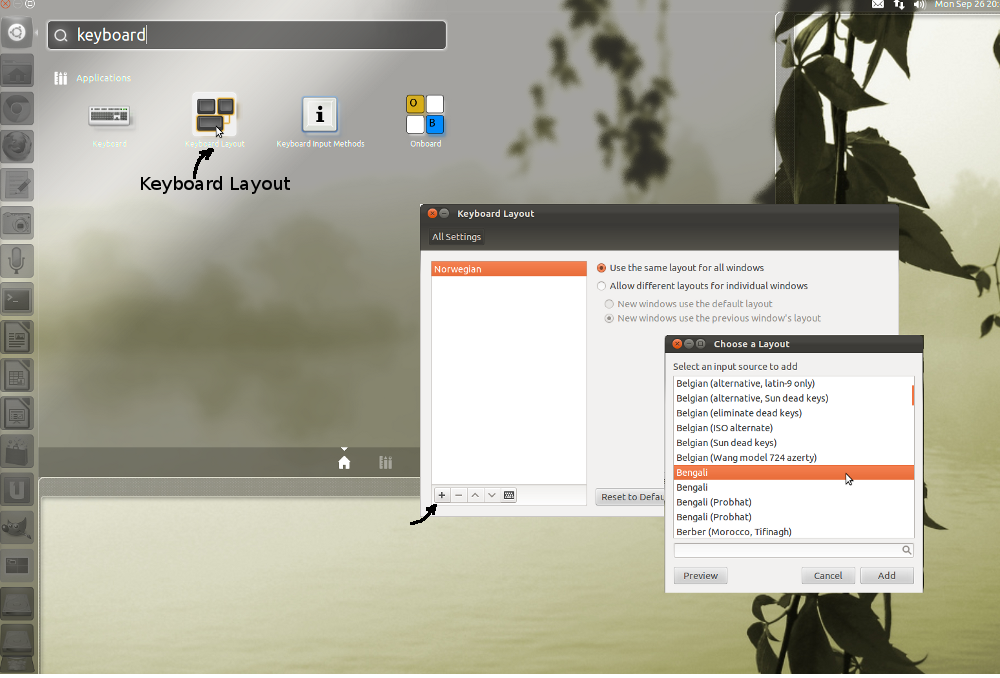
6b) Choose keyboard layout. Start the “Keyboard Layout” dialog from the Dash. Then add new and remove unnecessary keyboard layouts. See picture_6b.
7) Refine your desktop
Please reboot and login to your new Ubuntu desktop system.
Programs and system files (which we call packages) come from repositories. A repository… is an archive on the internet where program packages are stored and retrieved from. (more in this video…).
7a) Install support for multimedia formats
To make your desktop useable we need to install browser-plugins for Flash and Java. We will also add support for multimedia to make video, DVD and music play well in Ubuntu.
First, start a terminal window by pressing [Ctrl] + [Alt] + T keys simultaneously. Of course you can also start it from the Dash. Simply search for “terminal” and launch the application. Please study picture 7a…

Select one green line (command) at a time, then use your right-mouse button and copy & paste the command to the terminal window. The first sudo command will ask for your user password. Note that it expects your own, ordinary user password, that’s how the sudo works!
The following command will add the Medibuntu repository… to your package manager. Medibuntu provides many important applications, multimedia codeces and plugins. Run the following commands, one by one (see this example picture_7aa…).
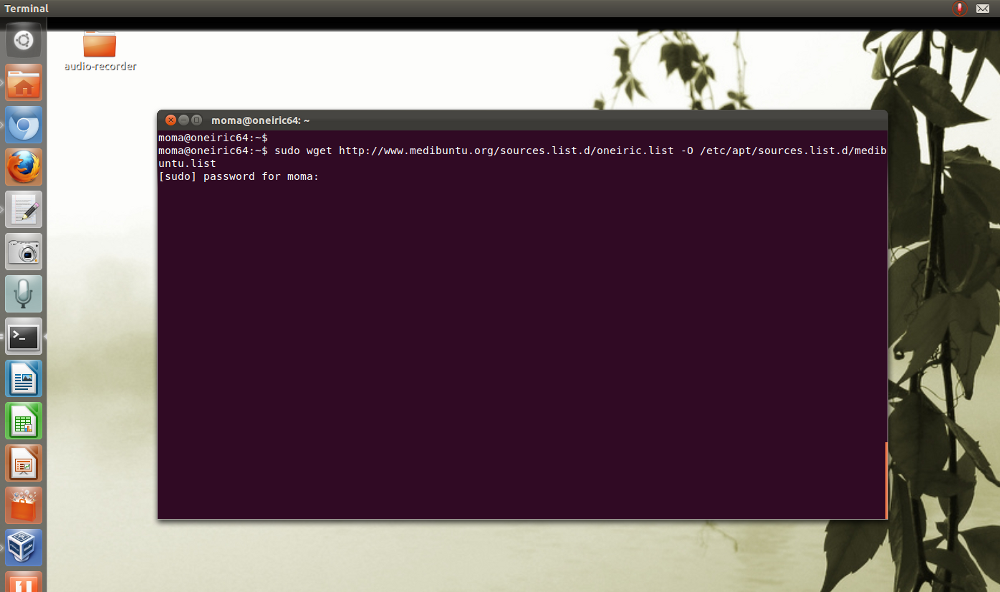
sudo wget http://www.medibuntu.org/sources.list.d/oneiric.list -O /etc/apt/sources.list.d/medibuntu.list
Now refresh the package list (package index) in your computer. Copy & paste this command.
sudo apt-get update
It may report a GPG-error on the Medibuntu’s repo. Do not worry, the next command will fix it. Medibuntu’s packages are signed with a private GPG security key. Add its public key part to your package system. Run
sudo apt-get -y –force-yes install medibuntu-keyring
Upgrade the system (in case there are updates available). Run
sudo apt-get upgrade -y
Add support for many multimedia formats… (mp3, avi) and ability to play encrypted DVDs. Answer “Y” to confirm the operation.
sudo apt-get install –reinstall ubuntu-restricted-extras non-free-codecs libdvdread4 libdvdcss2
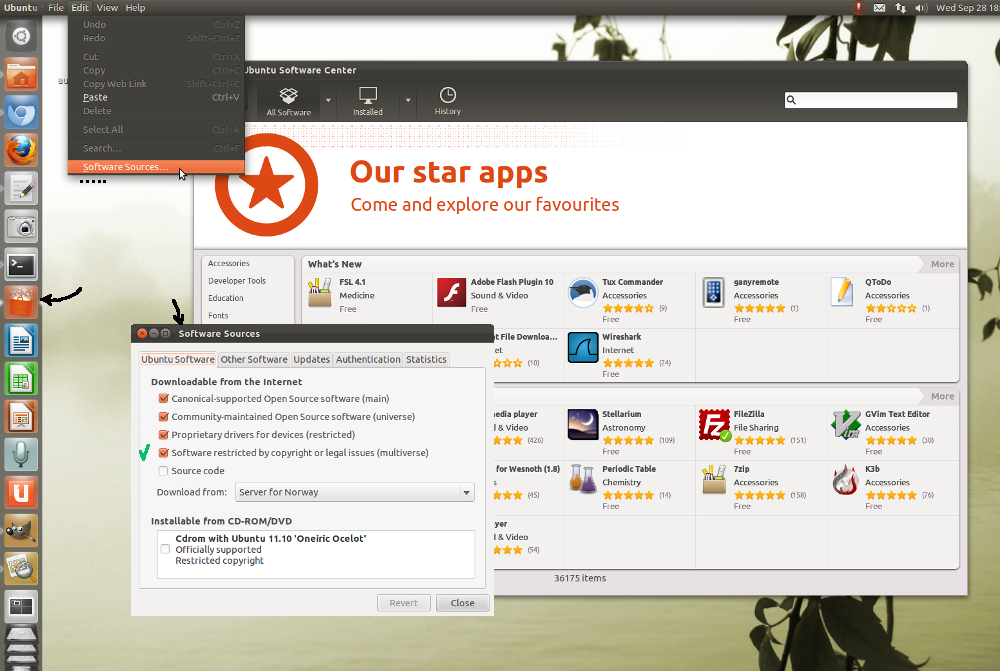
Activate also Canonical’s partner repository. Canonical is the company behind Ubuntu. This archive contains packages for Adobe’s Flash (both 32 and 64-bit), Acroread and Skype.
Run the following command only once, otherwise it may add duplicate lines to /etc/apt/sources.list file. You can check this from Ubuntu’s Software Center. Start the “Software Sources” dialog from its Edit menu, or start it directly from the Dash. Please study picture_7aaa…
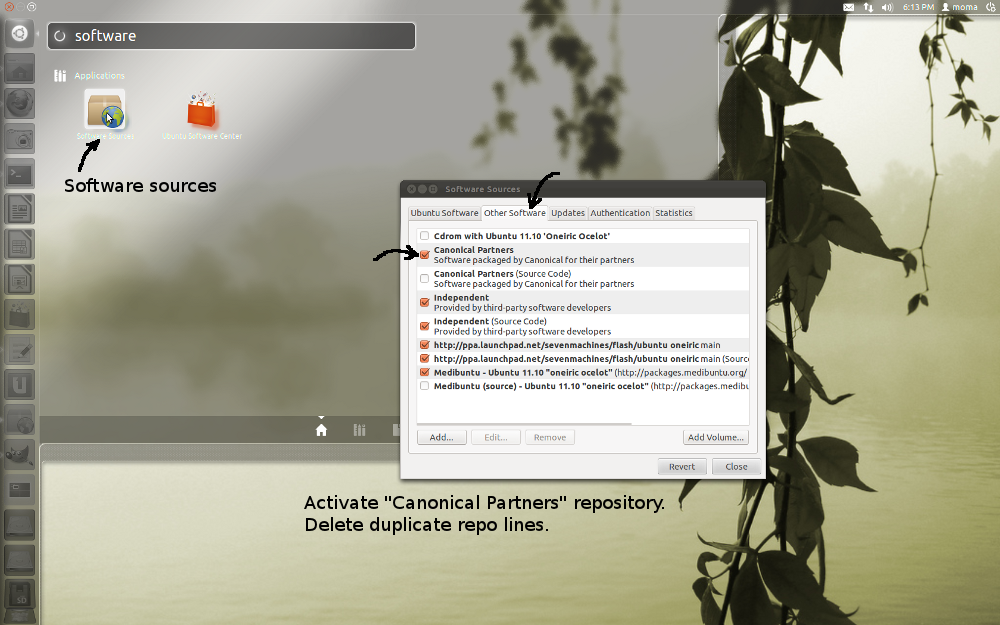
sudo add-apt-repository “deb http://archive.canonical.com/ubuntu oneiric partner”
Update also package index after this.
sudo apt-get update
7b) Install Java and Java browser plugin
Please make you selection:
7c) Install Flash plugin
Install Flash browser plugin. This will install either 32 or 64-bit Flash depending on your operating system. These packages come from Canonical`s Partner repository which you activated in the step 7a).
First, remove old, unnecessary packages.
sudo apt-get remove –purge adobe-flashplugin flashplugin* nspluginwrapper
Install 32 or 64-bit Flash. Answer “Y” to confirm this operation.
sudo apt-get install –reinstall adobe-flashplugin
Then restart your browser (firefox, opera, chromium, chrome, etc).
pkill firefox
7d) Install and start firewall
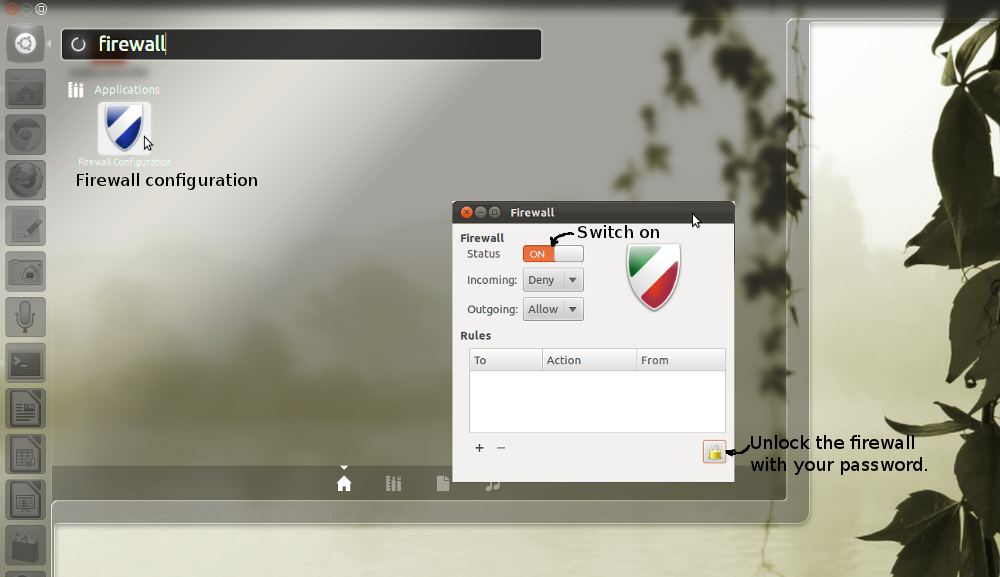
The Ufw… firewall (user friendly firewall) is a command line tool and gufw… is its grapical front-end. Run command
sudo apt-get install ufw gufw
Then activate the firewall. Run this command
sudo ufw enable
You can start the graphical UI for ufw from the Dash. See picture 7d… Click the “padlock” button to unlock the firewall settings. Make sure the firewall is enabled.
Firestarter… is another good firewall front-end to the Linux’s iptables firewall system.
7e) Speed up application start time with preload
Linux’s preload daemon… monitors what programs you use most often and caches these programs and dependent libraries in (unused) memory to speed up application start time. If your system has 1GB or more memory then preload will have a positive effect. Install and start the preload process. Run command
sudo apt-get install -y preload
It will automatically start at boot.
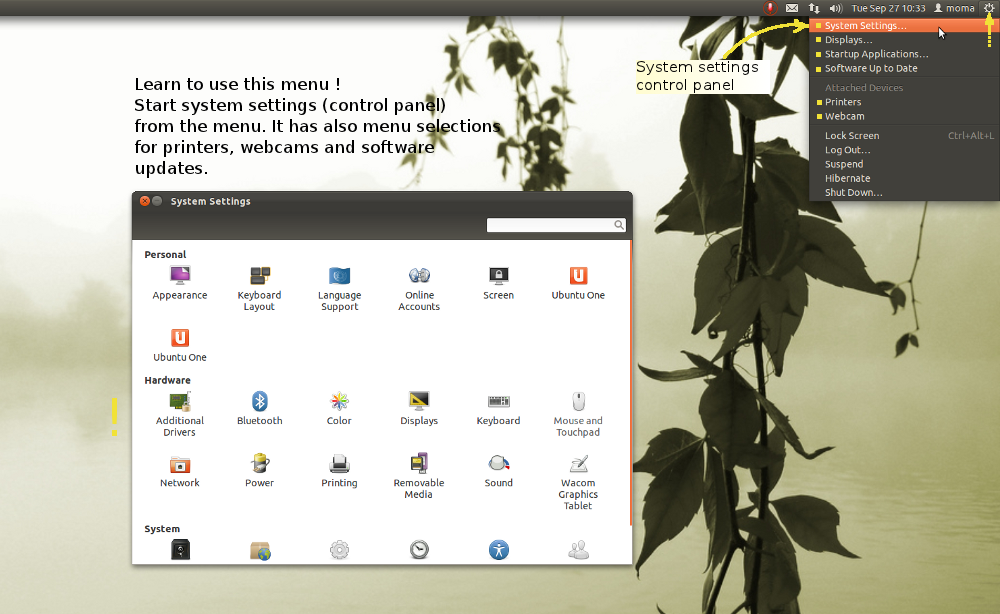
7f) System settings
Learn to know the system settings panel (or control panel). Start it from the system menu that you find in the upper right corner of the screen. Please see
—– —– —–
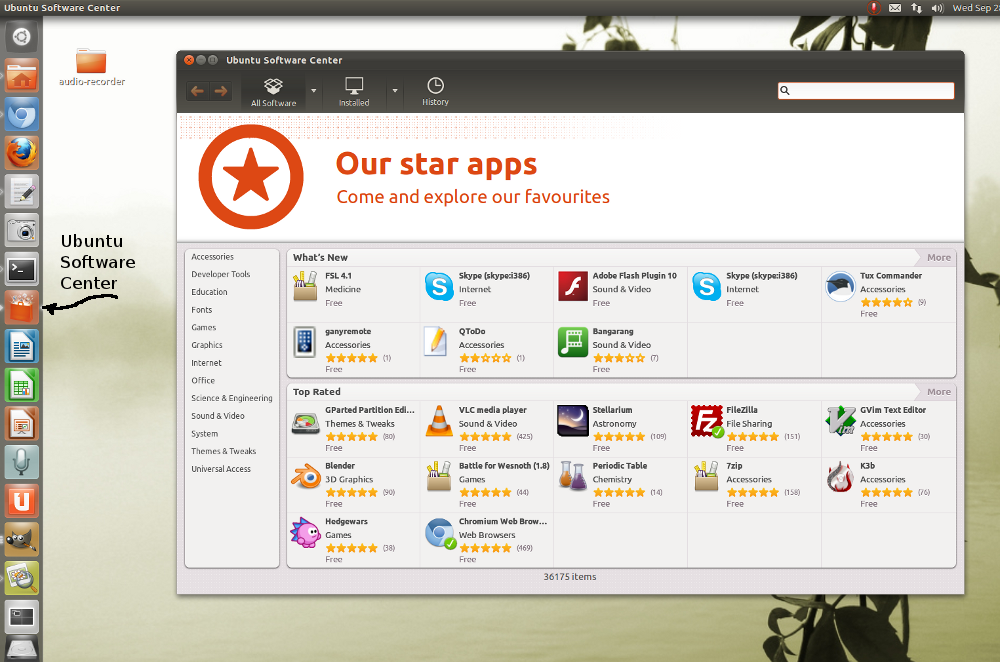
Note: We have here used command line to install some programs and packages. But normally we use the Ubuntu Software Center…

to install and remove packages/programs. Command line is snappy but GUI is often easier to use. Click this link… to learn about the Ubuntu Software Center.
Many old-time users still swear to Synaptic Package Manager. All of these three methods utilize the same underlying technology, so it does not matter what you use.
8) Some final tasks
8a) Get a super fast internet browser
Please make you selection:
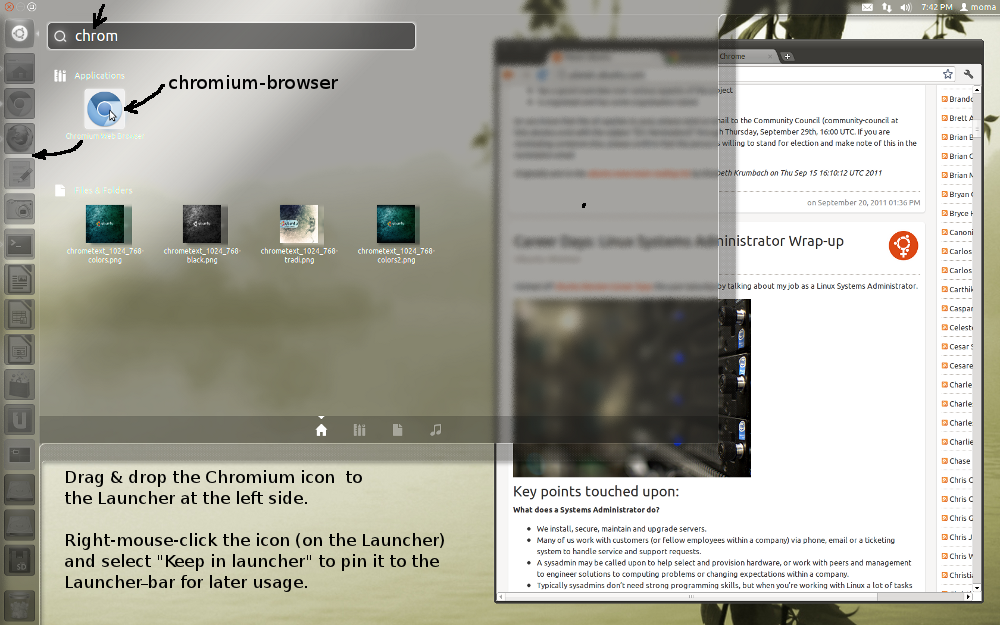
Chromium browser… is a community maintained version of the Google’s Chrome internet browser. Install this if you dare to run a super fast, bleeding-edge version of Google’s Chrome. Google builds its Chrome browser on this.
First, setup a package archive for this.
sudo add-apt-repository ppa:chromium-daily/ppa
Update the package index (package list) and install the browser.
sudo apt-get update; sudo apt-get install chromium-browser
After installation start Chromium browser from the Dash. Please see picture_8a…
8b) Install Google Earth
Install package-maker for Google Earth. It comes from the Multiverse repository. Make sure it is activated. See picture picture_8b… Update the package list (index) with “sudo apt-get update” if you made changes to the repositories.
sudo apt-get install googleearth-package
The ia32-libs is only needed by 64-bit Linux.
sudo apt-get install ia32-libs
Download the very latest version and build the package (run this as normal user, not as sudo).
rm googleearth*.deb; make-googleearth-package –force
Please wait, the above command may take a minute or two.
Then install the package
sudo dpkg -i googleearth*.deb
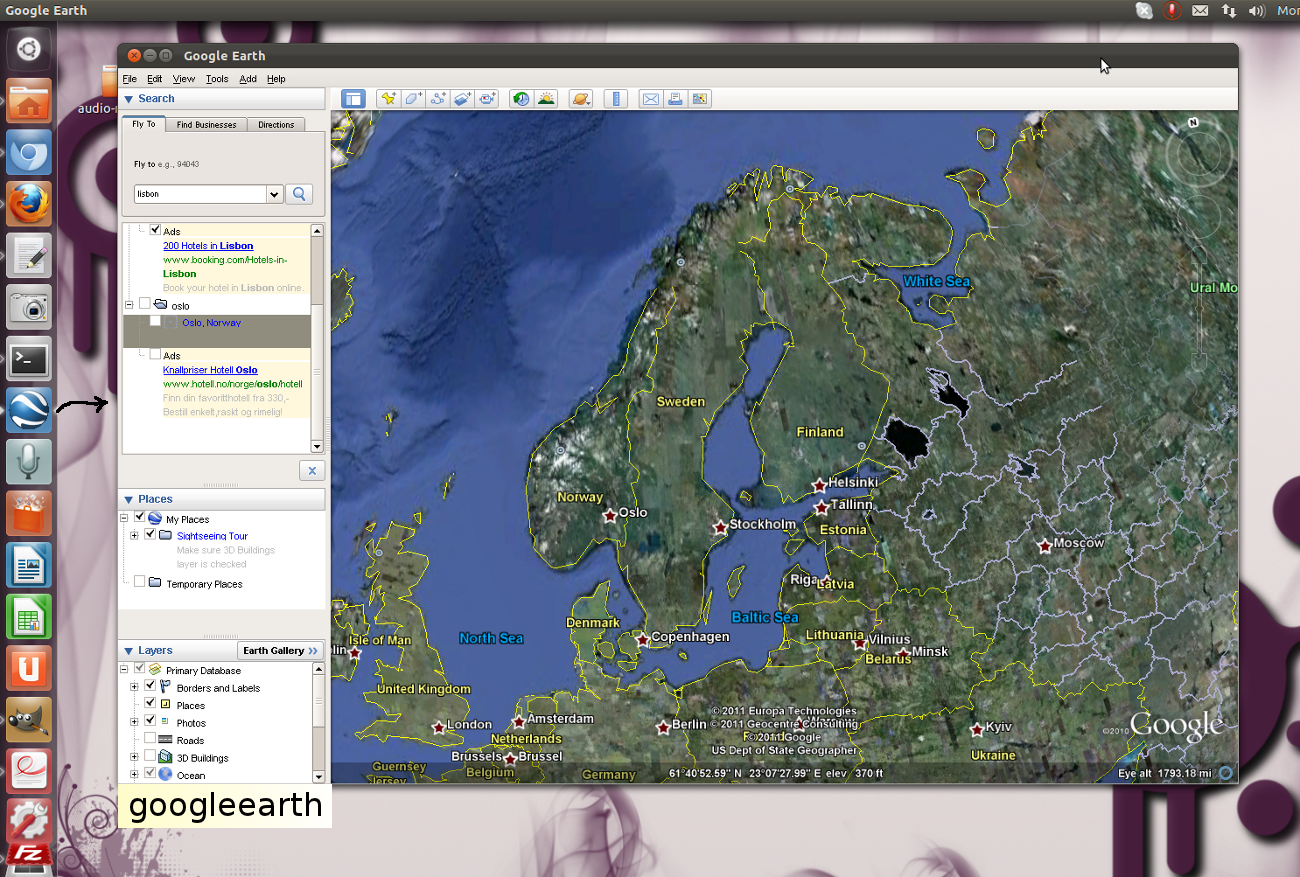
Start Google Earth from your Dash-screen or from the command line (run googleearth).
8c) Install Skype
Skype is a program that allows users to make voice calls over the Internet. Install this if you have a microphone or webcam and intend to make voice/video calls.
Activate Canonical’s Partner repository as shown in this picture…
Update also the package index if you made changes to the repositories. Run
sudo apt-get update
Then install Skype
sudo apt-get install skype
You can also get Skype package directly from skype.com.
Search and start Skype from the Dash-screen. Again use the icon’s right-click menu to pin it to the launcher. Ref. picture 8cb…
Important:Then check audio-settings for your webcamera or microphone. Please study picture 8c….
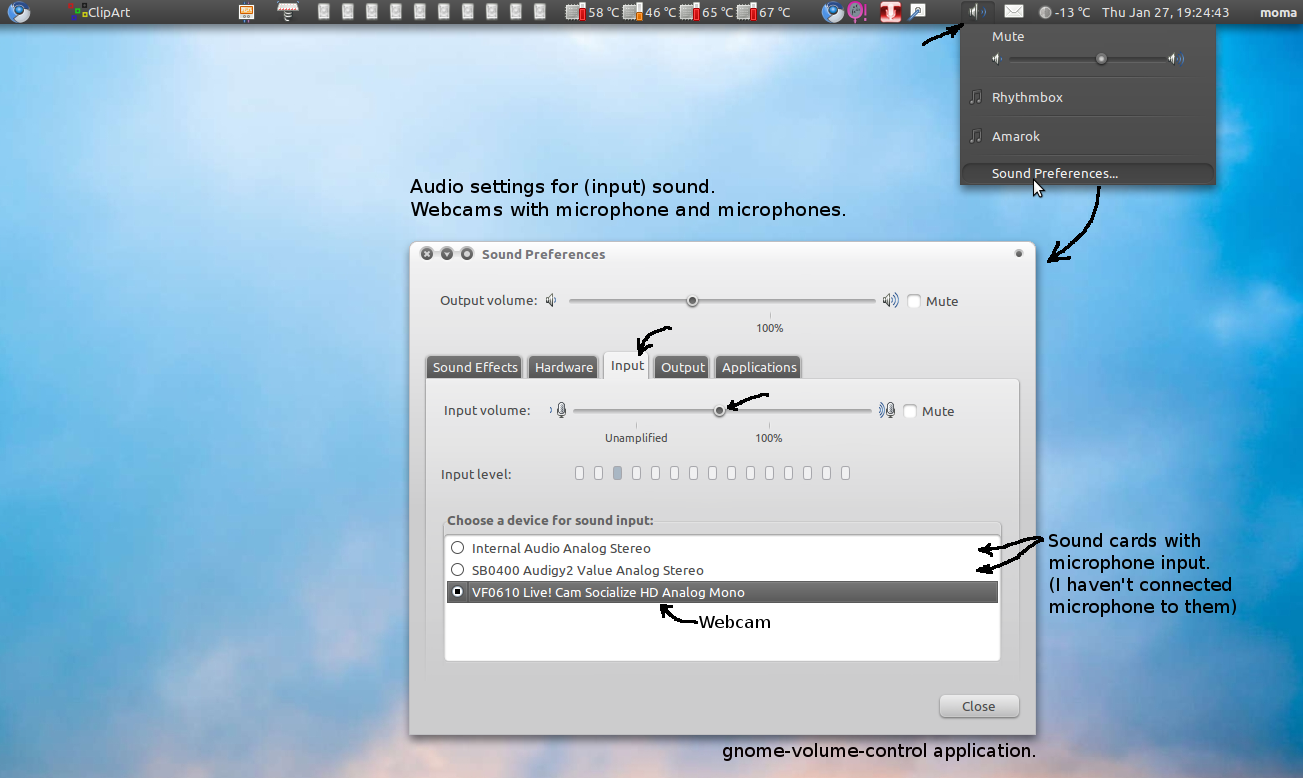
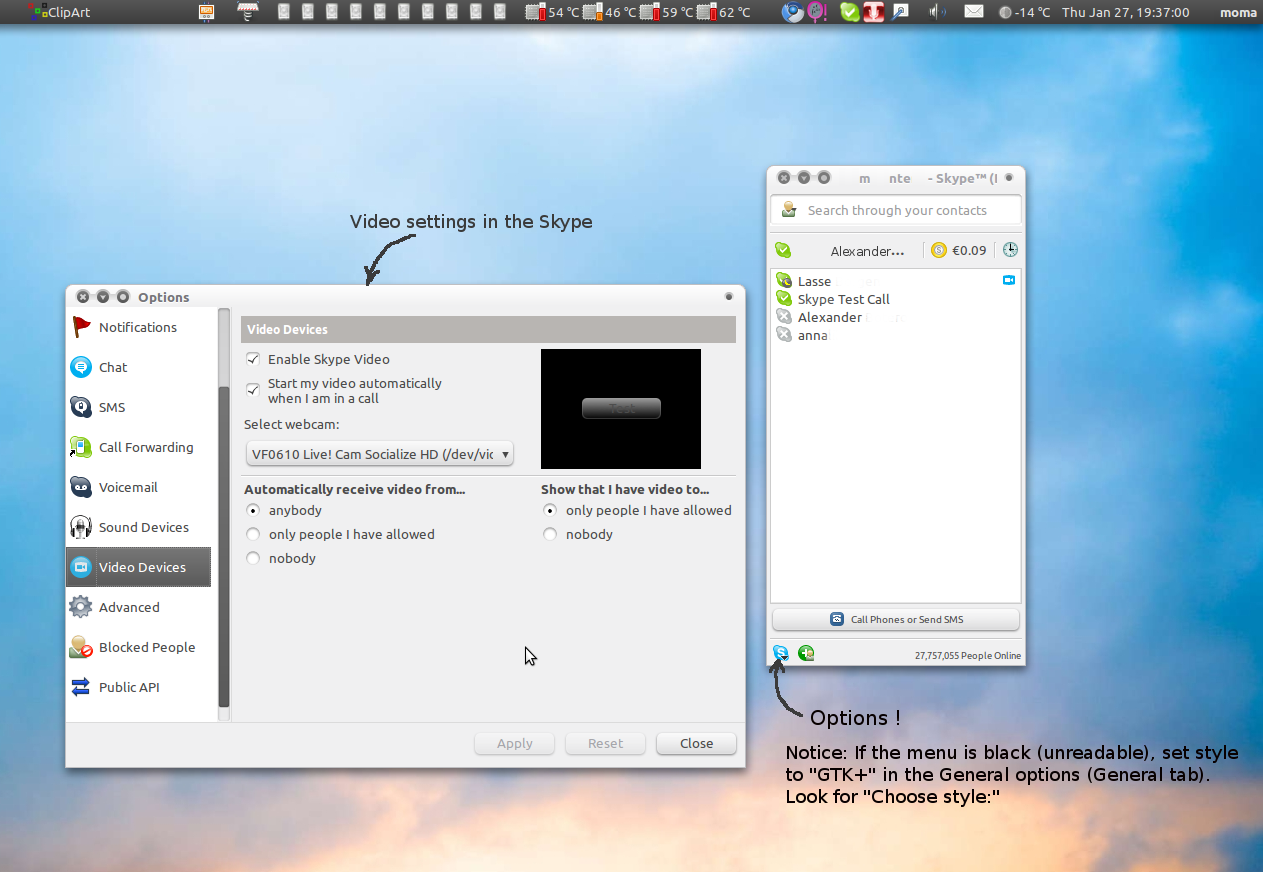
Check also video-settings in the Skype. See picture 8cc….
These webcams… should work well in Linux.
This picture shows how to record Skype conversations.
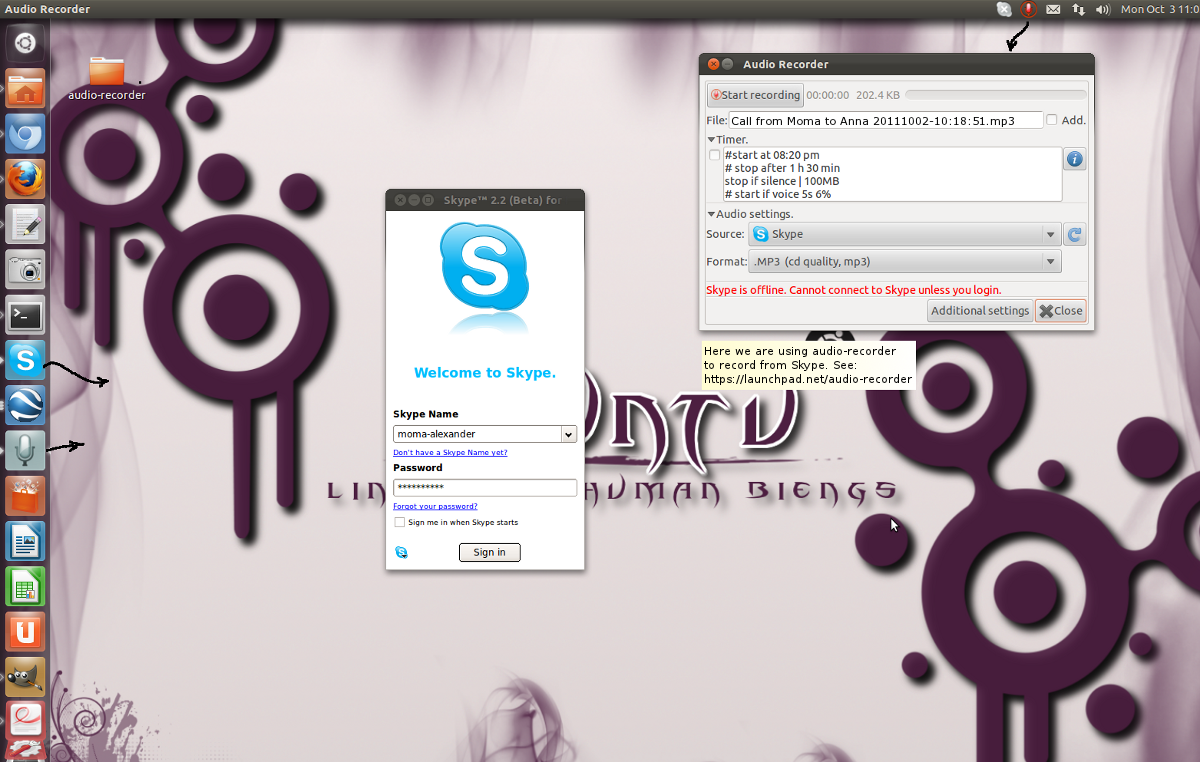
Please learn more about audio-recording…
8d) Install some additional programs
Start the Subuntu Software Center from the launcher, and search for programs/packages listed in the table. But first, study picture-7ff…
You can also install the programs by clicking the 1-click link in the rightmost column.
| gnome-tweak-tool (advanced settings) | Gnome-tweak-tool… allows you to change theme for the desktop, icons and mouse pointer, etc. Please watch this video… This tool appears as “Advanced settings” in the Dash-screen. You can also search for the “tweak” word. | Install tweak tool. |
| ubuntu-tweak | Ubuntu-tweak… lets you tweak many desktop-properties in Ubuntu. A very nice tool in-deed and easier to use than gconf-editor. It’s not in the repository. Get package for Oneiric from here… | |
| Deja Vu backup | Ubuntu comes with a very good backup tool. You can start it from the System Settings panel.  |
|
| hardinfo | Hardinfo… can show information about your system’s hardware and operating system, perform benchmarks, and generate printable reports either in HTML or plain text formats. AFAIK it does not install any menu selection. Start it from the CLI by typing hardinfo. Add a new entry to the menu or toolbar. lshw-gtk… (lshw) is another good tool to dig hardware details. | Install Hardinfo now. |
| gftp or filezilla | These are FTP/SFTP clients with GUI. I personally prefer Filezilla over gftp. |
Install FileZilla. |
| skype and ekiga | Skype and Ekiga are internet phone appliances. Read this… about softphones. |
Install Skype. Install Ekiga. |
| empathy | Empathy is a superior multi-protocol chat program. It’s preinstalled. You can start Chat directly from the menu. Please study this picture |
|
| Mozilla thunderbird | This is a very good email client. Thunderbird should be pre-installed. | Install Thunderbird. |
| liferea | Liferea… is a feed/news reader. Supports several feed formats.. | Install Liferea. |
| gwibber | Gwibber… is a blog editor. See also micro-blogger Drivel… and Polly twitter app… | Install Gwipper. Install Drivel. |
| Dia | Dia… diagram editor is a program to draw structured diagrams. | Install Dia. |
| acroread | Adobe’s PDF-reader. Ubuntu has its own document tools. Ubuntu/GNOME’s evince… can read PDF, postscript, djvu, tiff and dvi documents. I’ll stick to evince. | Install Acroread. Evince is pre-installed. |
| transmission | Transmission-gtk… is Ubuntu’s default torrent-client. Transmission-gtk is pre-installed. | |
| ardour | Ardour… is an excellent multitrack audio editor. Learn more about audio tools… | Install Ardour. |
| jokosher | Jokosher… Jokosher is a simple yet powerful multi-track studio. With it you can create and record music, podcasts and more, all from an integrated simple environment. | Install Jokosher. |
| PiTiVi or Openshot  |
I will recommend PiTiVi… and OpenShot… movie/video editors. Both are uber excellent products. Read this article… to learn more about movie editors in Linux. | Install PiTiVi. Install Openshot. |
| shutter | Shutter… is an awesome screenshot utility. Take and manipulate screenshots. | Install Shutter. |
| gtk-recordmydesktop | Take video recording of your desktop and applications. gtk-recordMyDesktop… puts an icon on the system tray (notification area) of your toolbar. Default output file name is out.ogg. About other good screencast applications, read article1… and article 2… Check also Kazam… screen recorder. | Install gtk-recordmydesktop. |
 audio-recorder |
This… is an awesome audio recording tool. This small tool allows you to record audio from your system sound card, microphones, browsers, webcams & more. Put simply; if it plays out of your speakers you can record it! Please watch the demo video first. This article… will tell you more.Its installation is very easy. Run: sudo add-apt-repository ppa:osmoma/audio-recorder sudo apt-get update sudo apt-get install audio-recorderAdd ability to record and play MP3 (get gstreamer0.10-plugins-ugly and gstreamer0.10-plugins-bad packages). sudo apt-get install gstreamer0.10-plugins-ugly gstreamer0.10-plugins-ugly-multiverseSearch for “audio-recorder” in your Dash-screen and pin its icon to the launcher, or make it start automatically at boot (check this option in its settings). |
|
| cheese | Cheese… can take pictures from your web camera and add fancy effects to them. Very good program to test your webcam and video camera. This can also share your photos. | Install Cheese. |
| video camera GUVC viewer |
GUVCViewer Video… is a viewer and capture tool for video and web cameras in Linux. More about it here… Very good program to test your webcam and video camera. | Install GUVCview. |
| Radio Tray | Radio Tray…is an online radio streamer that runs on the desktop’s system tray. | Install Radio Tray. |
| vinagre | Vinagre… is a remote desktop (VNC) client. | Install Vinagre. |
| imagemagic | Imagemagic… is a collection of nice command line tools to manipulate images; Commmands such as display, convert and mogrify can do anything with images/photos. Some good ImageMagick tutorials… | Install Imagemagick tools. |
| amarok | Amarok is an audio player with iPod support etc. It is a KDE (not GNOME!) application. Ubuntu’s Banshee… player can probably do the same tricks. Test the pre-installed Banshee first. Get music from Ubuntu One’s Music store! | Banshee is pre-installed. Install Amarok. |
| vlc | VLC is an open source video player with support for many audio and video formats. But I prefer the GNOME’s pre-installed Totem… movie player. | Install VLC. |
| The gimp |
The Gimp… is an advanced image manipulation program. Gimp is a rather advanced tool that requires training. Educate yourself with these tutorials… and extra plugins… | Install The Gimp. |
 shotwell shotwellpicasa |
Shotwell…is a great foto manager for Linux. Shotwell should be pre-installed. Start it from the Dash and pin it to the Launcher. DarkTable… is another good photography application and RAW editor. | Install shotwell. Install darktable. |
| scribus inkscape |
Scribus…is a desktop publishing tool DTP (KDE application). Inkscape… is SVG vector graphics editor. Read more… about the graphics tools. | Install Scribus. Install Inkscape. |
| simple-scan | Simple-scan is an easy-to-use scanning utility. Simple-scan is pre-installed. Search for “scan”. Install xsane… if you need more advanced features. | Install simple-scan. |
| kompozer | Kompozer… is a capable web design and authoring tool. Fork of NVU. KDE-application. | Install Kompozer. |
| handbrake thoggen dvdrip |
This guide… will tell you how to rip DVDs. | |
| frostwire | Frostwire… is a p2p file sharing client. Replaces Limewire. Download/install Frostwire from its webpage. Other alternatives are gtk-gnutella (in the repo) and phex. See also Nicotine+… | |
| mc and gnome-commander |
Midnight Commander… is a twin-panel file manager with powerful features and ease of use. These articles 1… and 2…can tell you more about orthodox file managers. | Install MC. Install gnome-commander. |
| build-essential | A meta package that contains compilers for c/c++ programmig. If you plan to compile programs from source code then you should get this package, otherwise no. It contains gcc compiler and that type of stuff. Study also these… c++ lessons. | Install build-essential. Install Code::Blocks IDE. |
8e) Norsk Tipping og Lotto
Norwegian Lotto system
Slik installerer du smart-kortstøtte for Norsk Tipping og Lotto.
Bla til denne siden… og klikk på lenken for “Smartkortstøtte 32bit og 64bit”. Den vil laste ned en programpakke som du må installere. Klikk på pakkenavnet etter nedlasting. Det vil installere alle nødvendige moduler for kortleseren.
Nederst på siden finner du også en guide for manuell installasjon.
Merk deg følgende: Smartkortleseren fungerer 100% bra med OpenJDK Java. Det er ikke nødvendig å installere (Oracles) sun-java6 eller sun-java6-plugin for dette. Punkt 7b… viser deg hvordan du installerer OpenJDK Java.
9) Test and GO!
Watch this music video… to check if your browser can play Flash content.
Test also your browser’s Java-plugin…
Norwegian users may also test if they can play the national TV’s (NRK’s) programme offerings… through the internet. Choose a channel… and programme and please wait (wait !) patiently till the playing starts. In the settings dialog (via the innstillinger link in the upper right corner), select “Windows Media Player”. This setting works very well in the Chromium… and Firefox browsers. You just installed Chrome/Chromium browser in the step 8a.
Some good software sources and games
PlayDep… contains many good games. Just click, install and run.
GetDep… contains fresh packages for Debian and Ubuntu.
Game sites
-
https://help.ubuntu.com/community/Games
-
Pinguspy’s game overview… and game videos…
Additional settings
Your personal cloud-account on the internet
Consider also signing to your cloud-account. Ubuntu gives you a free 5GB account on the internet where you can save your files and backups. It automatically synchronizes your $HOME/Ubuntu One/ directory with your internet account. You can share files with friends and other Ubuntueros, or use the account to stream music… to your devices.
First, configure Your Ubuntu One account. Study:
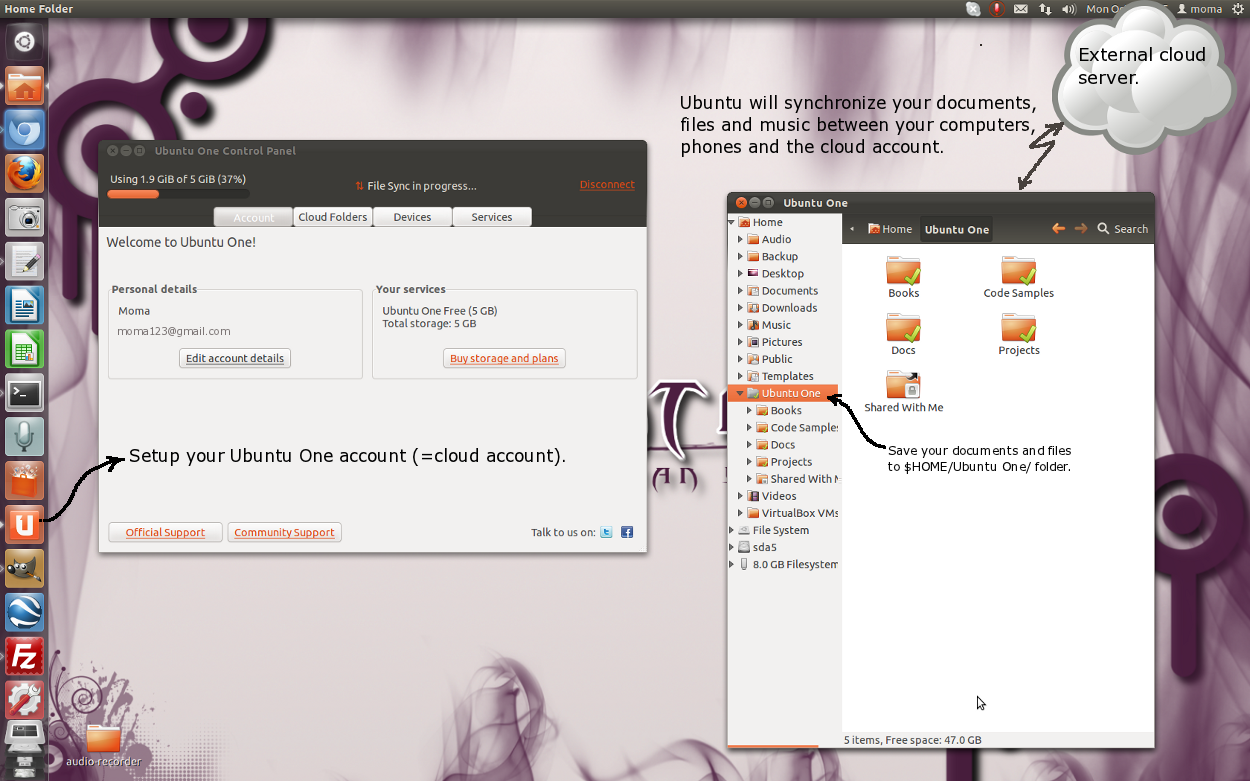
Save your work and files to “$HOME/Ubuntu One/” folder and everything is automatically synchronized with your cloud account… on the internet and other computers you logon.
You can also access your Ubuntu One from Android-devices and Microsoft Windows.
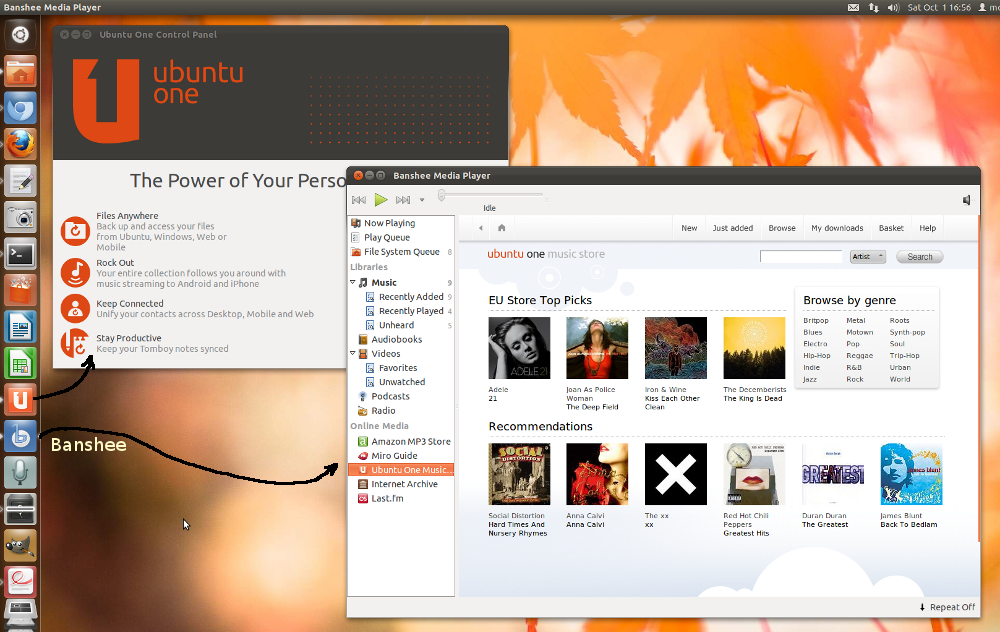
And don’t forget, you can conveniently buy music from Ubuntu’s Music store. Use your Banshee… media player to access the music.
Please see:
The most important guides
Study the most notable features… of Ubuntu 11.10 and its release notes… + a short installation… and motivation…. videos.
All 11.10 releated iso images and torrents…
Documentation library…
The Ultimate Ubuntu Guide… for Oneiric Ocelot.
Ubuntu Bible, read online… or download PDF…
Canonical’s Landscape Systems Management and Monitoring tool… (some Landscape features…)
Ubuntu’s manual project… and man pages… + the Ubuntu guide.pdf
Ubuntu screencasts…+ clips…
Full circle magazine… (a great Ubuntu mag).
Ubuntu weekly news…., actual topics… and Ubuntu’s dev channel….
Ubuntu planet… and Podcasts…
Ask Ubuntu… and Ubuntu forums… are good places to ask questions about *ubuntu.
Spread Ubuntu… materials with posters, brochures and presentations.
My favourite news sites are:
OmgUbuntu… iLoveubuntu… muktware… ubuntumanual… and h-online…
Other howtos
Developing applications for the Google’s Android phone…
Netfonds’ PrimeTrader trading software on Linux… (for Nordic and Norwegian users)
This PC’s sound card (Creative Labs SB0400 Audigy2) does not work out-of-the-box. Luckily it is easy to fix with “gnome-alsamixer”.
Install and start gnome-alsamixer
sudo apt-get install gnome-alsamixer
gnome-alsamixer
Correct setup for Audigy 2 is shown in this picture…
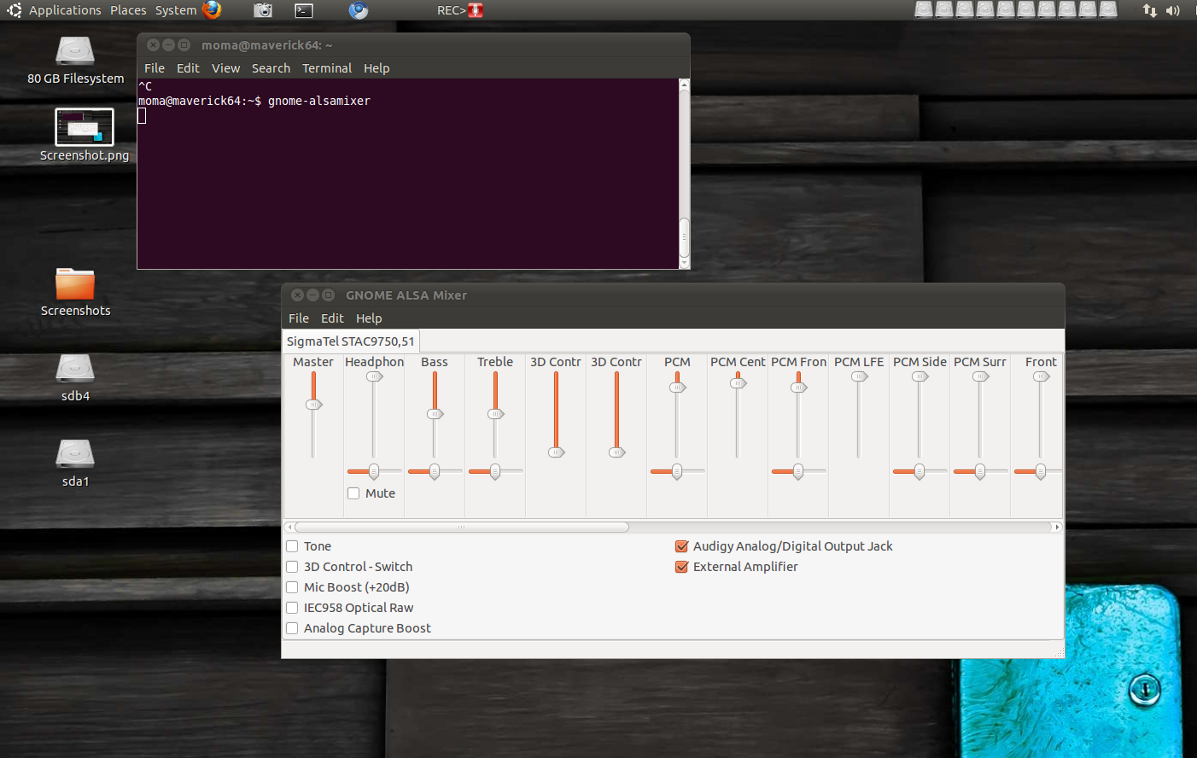
Do not forget to unmute the Master and PCM sliders. These are the most important ones.